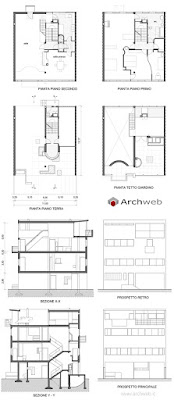
Below are screen shots of the architectural precedent by Le Corbusier in 3DS Max.
Saturday, 31 October 2015
Monday, 19 October 2015
3DS Max Notes
Navigation:
- Select object and hit Z to zoom on object
- With no selection, hitting z will fit the whole object to the view port
- Orbit by hlding alt + middle mouse button
- Pan with middle mouse button
- Zoom view through scroll wheel or hold crtl + alt key and drag with mioddle mouse button
- ALT + W to maximise a viewport
Link and Reference Content:
- Xref can be imported, but not edited
- Xref object can be transformed or modified when imported
- Xref oibjects, DWG, FBX and RVT can be linked to
- Update automatically” in the file command. Change to the model will not affect the oringial file
Working with scale:
- Unit set up > system unit set up
- Converting units on import may be required
- Automatically set to inches
Locating and managing objects:
- Use scene explorer to manage objects in scene
- Objects can be filtered y type or name
- Scene explorer can be configured toshow more properties
- Properties from multiple objects can be edited al at once
Move and select object:
- W = move
- E = rotate
- R = scale
- Y = placement mode which allows you to position objects onto surfaces
- H = select from scene dialogue
- Crossing region selection = all objects that are even partially in the selected area will be selected
- Window mode = all objects that are fully inside the window area will be selected.
- Crtl and click to multiple select
- Alt and click to deselect
- You can add odifiers to an object, each modifier provides additional tools and parameters to affect the object
- Re-ordering the modifies will affect the result
Motion:
- Time sliders can be used to view animations
- To adjust the number of frames you can see in the timeline, drag with the Right mouse buttin while holding Ctrl and Alt
- Auto key or set key mode can be used to animate
Apply and edit materials:
- To create new material, double click on material or drag from material map browser to active view. To assign material to an object, drag a connection from its outputsocket on to the object, or click the assign material to selected button.
- To adjust a materials components, double click its node, the parameter editor lists all components related to the material.
- Scanline, mental Ray, iRay can be used to render
Rendering:
- Use photometric lights, mrSun and mrSky for realisting lighting with the Nvidia renderes
- Make sure your lights are turned on
- Adding extra lights removes all te default lights
- You must choose the active renderer
- Use an environment map when using Nvidia renderers
- Use mental Ray materials or materials from the Autodesk Material Library for more sophisticated results
Thursday, 15 October 2015
Saturday, 12 September 2015
Week 7: Third Parametric Pavilion (Metaballs)
Theory: Mobility
A deck is added on to the site to provide an area for a shower and locker room below it.
The entrance leads to a shower/locker room area, open to the public.
The porous design allows sunlight to come through. Benches are also incorporated on to the site for people to use.
The porous design allows sunlight to come through. Benches are also incorporated on to the site for people to use.
The
design of this pavilion was inspired by P-Wall by Matsys and the fluid movement
of liquid substances. Made out of metaballs, the pavilion provides coverage
from sun. The “blobs” represent the culturally diverse community of
Woolloomooloo and how each ethnicity is individual yet is apart of the same
community.
Subscribe to:
Posts (Atom)


